Effective Modern C++笔记
最新更新于: 2025年5月6日下午1点36分
样例代码可参考GitHub - BartVandewoestyne/Effective-Modern-Cpp,这里记录一些自己觉得重要的有意思的点,本文中自己实现的用力位于GitHub - wty-yy-mini/effective-modern-cpp-examples
这是一本介绍C++11, 14特性的书籍,适合从C或C++98转向新版特性的人学习,由于我要提高在ROS中的C++编程效率,所以也需要学习该书籍
我使用的系统为Ubuntu24.04,编译器为g++ 13.2.0(台式机)和11.4.0(笔记本)
常用基础
查看型别
学会查看实参或形参的型别方法可以方便理解,查看Item4-查看型别的3中方法,这里给出一个头文件my_show_type.hpp,后续代码中可能用此文件中函数显示型别,编译中使用g++ -I <hpp文件路径> ...来找到头文件:
// my_show_type.hpp 用于显示模板形参的型别
#pragma once

#include <iostream>
#include <boost/type_index.hpp>
using std::cout;
using boost::typeindex::type_id_with_cvr;

#define PRINT_TYPE(x) (cout << type_id_with_cvr<decltype(x)>() << '\n')

template<typename T> void show_type_copy(T x) { cout << type_id_with_cvr<decltype(x)>() << '\n'; }
template<typename T> void show_type_lref(T &x) { cout << type_id_with_cvr<decltype(x)>() << '\n'; }
template<typename T> void show_type_rref(T &&x) { cout << type_id_with_cvr<decltype(x)>() << '\n'; }
术语
| 名称 | 英文名 | 含义 |
|---|---|---|
| 型别 | type | 参数的数据类型 |
| 形参 | parameter | 函数定义中的参数 |
| 实参 | argument | 调用函数时传入的实际参数 |
| 左值 | lvalue | 存在持久地址的对象,可执行取地址操作&x |
| 右值 | rvalue | 没有持久地址的临时对象,例如1+2, x*2 |
| 代理类 | proxy class | 一种变成思路,访问它前后植入控制逻辑,例如bool型别指针代理为std::vector<bool>::reference |
饰词的位置
在C++中装饰词const, volatile既可以在型别的前面也可以在后面
// 如下定义的x, y型别都一致
const char x;
char const x;
volatile char const y;
char const volatile y;
// 指向const char的const指针
char const* const ptr;
const char* const ptr;
自我总结
由于我对有些C++的基础还是不了解,这里总结一些我没见过但是感觉有用的内容
类型标识符使用typename
在C++11后推荐使用typename作为类型标识符,虽然以下这两种写法是等价的
template<typename T> class TD;
template<class T> class TD;并且typename可以用来强调类型,这一点在Item9中提到,当使用模板参数作为型别时,必须需要在前面加上typename
模板特化 (template specialization)
#include <my_show_type.hpp>

template<typename T>
void func(T x) { cout << "HI! "; PRINT_TYPE(x); }

template<>  // 对bool的特化
void func<bool>(bool x) { cout << "HI! You are bool!" << '\n'; }

template<typename T>
void func(T* x) { cout << "HI ptr! "; PRINT_TYPE(x); }

template<>  // 对bool*的特化
void func<bool>(bool* x) { cout << "HI ptr! You are bool ptr!" << '\n'; }

int main() {
    int x = 10;
    bool flag = false;
    func(x);
    func(true);
    func(&x);
    func(&flag);
    return 0;
}
重载类运算符
重载++
#include <iostream>
using std::cout;

class Foo {
public:
    int a;
    Foo(int a=0): a(a) { }
    Foo& operator++(){ ++a; return *this; }  // 前置++
    Foo operator++(int) {  // 后置++
        Foo tmp = *this;
        ++a;
        return tmp;
    }
    void show() { cout << "a=" << a << '\n'; }
};

int main() {
    Foo foo(10);
    (foo++).show();     // a=10
    foo.show();         // a=11
    (++foo).show();     // a=12
    foo.show();         // a=12
    return 0;
}
重载二元运算符
#include <iostream>
#include <cstdio>
using std::cout;

class Foo {
public:
    int a{1};
    Foo() { }
    Foo(int a, int b, int c): a(a), b(b), c(c) {}
    // 重载二元运算符时, 友元函数会将this传入到低一个位置, 类似python中的self
    friend Foo operator+(const Foo& self, const Foo& other) {
        return Foo(self.a+other.a, self.b+other.b, self.c+other.c);
    }
    Foo operator*(const Foo& other) {  // 也可以不用友元函数
        return Foo(this->a*other.a, this->b*other.b, this->c*other.c);
    }
    // 友元函数可以访问类中的私有变量
    friend void friend_can_write_outside(Foo&);
    void show() { printf("%d %d %d\n", a, b, c); }

private:
    int b{2}, c{3};
};

void friend_can_write_outside(Foo& foo) {
    printf("Private b=%d, c=%d\n", foo.b, foo.c);
}

int main() {
    Foo foo, foo2;
    (foo + foo2).show(); // 2 4 6
    (foo * foo2).show(); // 1 4 9
    friend_can_write_outside(foo); // Private b=2, c=3
    return 0;
}
类相关性质
常量成员函数
#include <my_show_type.hpp>

class Foo {
public:
    int a{10};
    void foo() const {
        // a = 20;  // 不能对成员变量修改
        // hi();  // 只能调用常量成员函数
        foo2();  // OK
    }
    void foo2() const { cout << a << '\n'; }
    void hi() { cout << "HI" << '\n'; }
} foo;

int main() { foo.foo(); return 0; }
函数重写与重构
函数重写(override)在Item12:用override改写函数中详细介绍
| 关键字 | 含义 | 使用位置 | 解释 |
|---|---|---|---|
virtual |
虚函数 | 基类 | 会建立虚表vtable, 子类重写后, 指针转换为基类时, 虚函数还是指向子类重写的函数 |
... = 0 |
纯虚函数 | 基类 | 该函数必须由子类重写, 否则无法完成vtable创建 |
override |
明确重写基类虚函数 | 子类 | 推荐加上,在编译时会强制检查重写的函数与基类的形参型别、返回值、函数名、是否常量函数、引用饰词是否一致 |
final |
最终重写 | 子类 | 禁止后续继承于该子类的子类重写 |
只有在实例化该类时,才会检查vtable是否全部创建
#include <memory>

class Foo {
    /* ------------------------------ overload ------------------------------ */
    void hi();  // 相同函数名, 不同形参的型别
    void hi(int a);
    void hi(double a);
    /* ------------------------------ override ------------------------------ */
    virtual void func() const = 0;  // 如果没有=0就报错没有vtable, 因为所有virtual都需要实现
};
class Bar: public Foo {
    /* ------------------------------ override ------------------------------ */
    void func() const override final { };  // 在子类中继承重写
};
class Derived: public Bar {
    // void func() const override { };  // 不能再重写final函数了
};

int main() {
    // Foo foo;  // error: cannot declare variable ‘foo’ to be of abstract type ‘Foo’
    Foo* foo = new Bar;
    std::unique_ptr<Foo> foo2 = std::make_unique<Bar>();  // 推荐用智能指针
    Bar bar;
    return 0;
}
访问权限
| 关键字 | 访问权限 |
|---|---|
public |
所有都可访问 |
private |
只有自己可以访问 |
protected |
自己和子类可以访问 |
explicit 明确构造函数
这是一种禁止隐式类型转换的限制,在构造函数前使用
class Foo {
public:
    Foo(double x): a(static_cast<int>(x)) { }
    explicit Foo(int x): a(x) { }
private:
    int a;
};

int main() {
    // 无法隐式转换
    // Foo foo = 5;  // error: conversion from ‘int’ to non-scalar type ‘Foo’ requested
    Foo foo2{5};
    Foo foo3 = 5.0;  // 没有explicit可以隐式转换
    return 0;
}
区分左右值传入的函数
先说结论,常用的左右值传入为
void func(const T& x)  // 接受: 左值, const左值, const右值
void func(T&& x) // 接受: 右值因此在构造函数中const T&通常用于复制构造,T&&通常用于移动构造,以std::string为例,参考Item23中string初始化左右值不同
下面代码中展示了,每个形参型别的优先级区别:
| 实参型别 | 形参接收的优先级 |
|---|---|
const T&& |
const T&&, const T& |
T&& |
T&&, const T&&, const T& |
如果
T型别的形参读入存在,则T相关的其他任何型别读入都不能存在(就算T, T&存在,在调用时候也会出现报错,无法确定调用哪一个)
#include <my_show_type.hpp>

// void func(int) { cout << "HI int" << '\n'; }
// 这个const int定义完全没有意义和int相同, 因为按值传递会自动忽略修饰词const
// void func(const int) { cout << "HI cont int" << '\n'; }

// void func(int&) { cout << "HI int&" << '\n'; }
void func(int&&) { cout << "HI int&&" << '\n'; }
void func(const int&) { cout << "HI const int&" << '\n'; }
// void func(const int&&) { cout << "HI const int&&" << '\n'; }

// const T&&索引优先级: const T&&, const T&
// int索引优先级: int&&, const int&&, const int& (注意这里不能放到int&上, 如果有int其他的型别也都不存在)
// 当const T&和T&&存在时, T&&接受非const右值, cosnt T&接受除去非const右值以外的所有值(左值,const左值,const右值)

int main() {
    func(123);
    int a{123};
    func(a);
    // func(std::move(a));
    const int b{123};
    // func(std::move(b));
    func(b);
    return 0;
}
重要准则
这里和《Effective Modern C++》中的准则顺序一致,对其进行进一步总结,并给出自己尝试的用例,全部用例请见:GitHub - wty-yy-mini/effective-modern-cpp-examples
Item1:模板型别推导
- 模板型别推导时,引用型实参会被当成非引用型处理,也就是实参中引用的记号
&会直接被无视 - 模板中存在万能指针(Universal Reference, URef)
&&时,左值会被作为左值引用处理#include <iostream> #include <boost/type_index.hpp> using boost::typeindex::type_id_with_cvr; using std::cout; template<typename T> void f(T&& param) { cout << type_id_with_cvr<T>() << ", "; cout << type_id_with_cvr<decltype(param)>() << '\n'; } int main() { int x = 27; const int cx = x; const int& rx = x; f(x); // x is lvalue, so T is int&, // param's type is also int& f(cx); // cx is lvalue, so T is const int&, // param's type is also const int& f(rx); // rx is lvalue, so T is const int&, // param's type is also const int& f(27); // 27 is rvalue, so T is int, // param's type is therefore int&& } - 模板形参为按值传递时,则无视型别的cvr(const, volatile, reference)饰词,直接传入型别,需要注意
const char* const去除掉指针的饰词变为const char* - 模板型别推导时,数组和函数在按值传递时退化为指针,在形参引用时不会退化
#include <iostream>
#include <boost/type_index.hpp>
using std::cout;
using boost::typeindex::type_id_with_cvr;

// 模板按值传递 (发生退化)
template<typename T> void func(T x) { cout << type_id_with_cvr<decltype(x)>() << ", "; }
// 模板引用形参 (不会退化)
template<typename T> void func2(T &x) { cout << type_id_with_cvr<decltype(x)>() << '\n'; }
// 模板传递数组模板 (获取数组大小N)
template<typename T, size_t N> decltype(auto) arraySize(T (&s)[N]) { return N; }

void call_func(void (&f)()) { f(); }  // 指定的函数引用
template<size_t N>  // 必须手动获取数组大小 N
void show_array_size(char (&s)[N]) { cout << "array=" << s << ", size=" << N << '\n'; }

void foo() { cout << "foo!" << '\n'; }
void bar(int a) { cout << "bar!" << '\n'; }

int main() {
    auto a = 1;
    func(foo), func2(foo);  // void (*)(), void (&)()
    call_func(foo);  // foo!
    // call_func(bar);  // 报错
    func(bar), func2(bar);  // void (*)(int), void (&)(int)
    char s[] = "abc123def";
    cout << type_id_with_cvr<decltype(s)>() << '\n';  // char [10]
    func(s), func2(s);  // char*, char (&) [10]
    show_array_size(s);  // array=abc123def, size=10
    const char* const ptr = s;
    func(ptr), func2(ptr);  // char const*, char const* const
    cout << arraySize(s) << '\n';  // 10
    // cout << arraySize(ptr) << '\n';  // 报错
    return 0;
}
Item2:auto型别推导
auto型别推导与模板型别推导一致,除去以下两种情况:- 假定用大括号初始化表达式为
std::initializer_list<T>类型,而模板型不会 - 函数返回值或lambda形参中使用auto,表示使用模板型推导,而非auto型推导
- 假定用大括号初始化表达式为
#include <my_show_type.hpp>

int main() {
    auto x = {1, 2, 3};
    auto func = [](auto x) { cout << x.size() << '\n'; };
    func(x);  // 3
    show_type_lref(x);  // std::initializer_list<int>&
}
Item3:decltype型别推导
decltype会直接得到变量或表达式的型别,除去以下一种情况:- 当表达式中加上括号
(x),(((x))), …,就会得到T&类型
#include <my_show_type.hpp> decltype(auto) func() { int x = 1; return x; // int () // 加上括号会返回引用 // return (x); // int& () // return ((x)); // int& () } int main() { cout << type_id_with_cvr<decltype(func)>() << '\n'; return 0; }- 当表达式中加上括号
- C++14支持
decltype(auto)可以直接推导出auto的型别
Item4:查看型别的3种方法
存在3中方法
- IDE自动推理,将鼠标放上去即可看到推理的数据类型(如VsCode加上C++插件),可能很慢
- 编译器报错显示,本质上就是通过编译报错中的显示内容,判断当前的数据类型
template<class> class TD; // Type Display template<typename FuncType, typename ValueType> decltype(auto) call(FuncType func, ValueType value) { // error: ‘TD<void (*)(int)> FuncTypeDebug’ has incomplete type TD<FuncType> FuncTypeDebug; return func(value); } void hi(int a); int main() { call(hi, 5); auto a{5}; auto* b = &a; // error: aggregate ‘TD<int> TypeADisplay’ has incomplete type and cannot be defined TD<decltype(a)> TypeADisplay; // error: aggregate ‘TD<int*> TypeBDisplay’ has incomplete type and cannot be defined TD<decltype(b)> TypeBDisplay; // error: aggregate ‘TD<void> TypeCallDisplay’ has incomplete type and cannot be defined TD<decltype(call(hi, 5))> TypeCallDisplay; return 0; } - (推荐)用
boost::typeindex::type_id_with_cvr输出类型,该函数模板返回boost:typeindex::type_index,可以使用成员函数pretty_name产生可读的std::string类型,直接用cout <<也可以转为可读类型显示#include <iostream> #include <boost/type_index.hpp> using std::cout; using boost::typeindex::type_id_with_cvr; template<typename FuncType, typename ValueType> decltype(auto) call(FuncType func, ValueType value) { cout << type_id_with_cvr<FuncType>() << '\n'; return func(value); } void hi(int a) {}; int main() { call(hi, 5); // void (*)(int) auto a{5}; auto* b = &a; char c[] = "abc"; auto s{"abc"}; auto& s2{"abc"}; cout << type_id_with_cvr<decltype(a)>().pretty_name() << '\n'; // int cout << type_id_with_cvr<decltype(b)>() << '\n'; // int* cout << type_id_with_cvr<decltype(call(hi, 5))>() << '\n'; // void cout << type_id_with_cvr<decltype(c)>() << '\n'; // char [4] cout << type_id_with_cvr<decltype(s)>() << '\n'; // char const* cout << type_id_with_cvr<decltype(s2)>() << '\n'; // char const (&) [4] return 0; }
Item5,6:推荐使用auto
- 使用auto类型作为变量初始化,可避免空内容的问题,打字更快
- 代理类可能导致auto推理出意想不到的型别,例如
std::vector<bool>::reference
#include <my_show_type.hpp>
#include <vector>
using std::vector;

int main() {
    vector<bool> vb(5);
    auto a = vb[0];
    PRINT_TYPE(a);  // std::_Bit_reference
    bool b = vb[0];
    PRINT_TYPE(b);  // bool
    auto c = static_cast<bool>(vb[0]);  // 强调进行了型别变换
    PRINT_TYPE(c);  // bool

    auto x = 0.9;
    PRINT_TYPE(x);  // double
    auto y = static_cast<float>(x);  // 强调进行型别变换
    PRINT_TYPE(y);  // float
    return 0;
}
Item7:可以使用{}创建对象
- 使用
{}创建对象优点:窄化变换时会报错,从float/double -> int;当没有初始化参数创建对象时,写Foo foo();会被视为函数声明,但是Foo foo{};仍然可用,为什么不直接写Foo foo;呢? - 缺点:初始化函数中有
initialize_list<T>变量时,且存在将传入的实参转为initialize_list<T>的可能性时,则一定会调用该函数,无视其他初始化函数 - 在使用vector时,用
{}就一定会用initializer_list初始化
#include <my_show_type.hpp>
#include <vector>

class First {
    public:
    First(int a) { cout << "init 1-1" << '\n'; }
};

class Second {
    public:
    Second(int a, int b) { cout << "init 2-1" << '\n'; }
    // 如果存在可转换数据类型的std::initializer_list, 大括号就一定会调用该函数
    Second(std::initializer_list<int> x) { cout << "init 2-2" << '\n'; }
    Second(std::string a, int b) { cout << "init 2-3" << '\n'; }
};

class Third {
    public:
    Third(std::string a, float b) { cout << "init 3-1" << '\n'; }
    Third(std::initializer_list<std::string> x) { cout << "init 3-2" << '\n'; }
};

int main() {
    First a(4.0);  // init 1-1
    // First a2{4.0};  // 报错, 无法进行窄化变化(narrowing conversion), 从double->int会损失精度
    First a2{static_cast<int>(4.0)};  // init 1-1
    First a3(true);  // init 1-1, bool -> int不会丢失精度

    Second b(1, 2);  // init 2-1
    // 存在转化为initializer_list<int>可能, 则会优先
    Second b2{1, 2};  // init 2-2, 存在可能就会调用形参为initializer_list
    Second b3{"HI", 2};  // init 2-3
    // 存在转为initializer_list<int>可能, 但是需要将double->int, 由于无法窄化变换, 报错
    // Second b4{1.0, 2};

    Third c{"HI", 1};  // init 3-1, 不存在转为initializer_list<std::string>可能
    Third c2{"HI", 1.0};  // init 3-1, 从double变化到float不算窄化
    Third c3{"HI", "OK"};  // init 3-2

    std::vector<int> v{10, 20};  // 使用了initializer_list创建方法
    cout << v.size() << '\n';  // 2
    std::vector<int> v2(10, 20);  // 创建了长度为10, 每个值都是20的vector
    cout << v2.size() << '\n';  // 10
    return 0;
}
Item8:优先使用nullptr
- 相比使用
0和NULL作为空指针传递,nullptr传入模板时效果更好
#include <my_show_type.hpp>
template<typename FuncType, typename PtrType>
void func(FuncType& func, PtrType ptr) { func(ptr); }

void foo(int* a) { cout << "foo! " << a << '\n'; }

int main() {
    // 可以但是不清晰
    foo(0);
    foo(NULL);
    foo(nullptr);

    // 使用模板会直接导致报错, 仅有nullptr可行
    // func(foo, 0);  // error: invalid conversion from ‘int’ to ‘int*’
    // func(foo, NULL);  // error: invalid conversion from ‘long int’ to ‘int*’
    func(foo, nullptr);  // int*
    return 0;
}
Item9:优先使用using而非typedef
- 别名声明
using T = ...支持模板化,而typedef需要自己构造非常麻烦
声明与模板的基本用法
#include <my_show_type.hpp>

// 定义型别映射
using ll = long long;
typedef long long LL;

// 定义函数指针型别的两种方法
using func_ptr = void (*)(ll);  // 更加清晰
typedef void (*func_ptr2)(LL);  // 注意型别名称位置

void func(func_ptr f, ll a) { f(a); }
void func2(func_ptr2 f, ll a) { f(a); }
void foo(ll a) { cout << a << '\n'; }

int main() {
    func(foo, 42ll);
    func2(foo, 30ll);
}
别名模板效果更好
#include <map>
#include <vector>
#include <my_show_type.hpp>
using std::map;
using std::vector;

/* ---------------------------------- 别名模板 ---------------------------------- */
template<typename T>
using MyMap = map<T, std::vector<T>>;

template<typename T>
struct Foo { MyMap<T> mp; };

/* ------------------------------ typedef创建型别模板 ----------------------------- */
template<typename T>  // 通过构造struct, 将别名赋值到type上
struct MyMap2 {
    typedef map<T, std::vector<T>> type;
};

template<typename T>  // 使用时需引用::type并声明为typename
struct Foo2 { typename MyMap2<T>::type mp; };

template<template<typename> typename T>  // T是模板类型支持一个型别参数传入
void run() {
    T<int> foo;
    PRINT_TYPE(foo);
    foo.mp[4] = {1,2,3,4};
    foo.mp[1] = {3,4};
    for (auto x : foo.mp) {
        cout << "key=" << x.first << ", value=";
        PRINT_TYPE(x.second);
        for (auto y : x.second) { cout << y << ' '; }
        cout << '\n';
    }
}

int main() {
    run<Foo>();
    run<Foo2>();
    return 0;
}

/* --------------------------------- Return ---------------------------------
Foo<int>
key=1, value=std::vector<int, std::allocator<int> >
3 4
key=4, value=std::vector<int, std::allocator<int> >
1 2 3 4
Foo2<int>
key=1, value=std::vector<int, std::allocator<int> >
3 4
key=4, value=std::vector<int, std::allocator<int> >
1 2 3 4
-------------------------------------------------------------------------- */
Item10:优先使用限定作用域的枚举型别
- C++98风格的
enum Color { black, white, red };被称为不限范围的(unscoped)枚举型别,导致初始化了变量名black, white, red(如果在全局定义,就是全局变量名) - C++11中加入限定作用域的(scoped)枚举型别
enum class Color { black, white, red };更不容易泄漏名字,不会初始化全局变量名,而是要通过类引用 - 限定作用域参数必须通过强制型别转换
static_cast<int>(Color::red),才能变为其他型别,而不限范围枚举可以随意转化(从int转其他) - 限定作用域可以前置声明(在头文件中定义),因为默认底层型别是
int,而不限作用域需要指定底层型别才能前置声明enum Color2: int
下面这个例子给出头文件enum_header.hpp以及对应的enum_scoped_with_unscoped.cpp用于理解:
#pragma once
#include <my_show_type.hpp>

// 无法前置声明, 在创建时才自动推理出底层型别
// enum Color2;  // error: use of enum ‘Color2’ without previous declaration
enum Color2: int;  // 必须指定底层型别
// 可以前置声明, 默认底层型别为int
enum class Color;

void hello_color(Color x) {
    cout << "hello: " << static_cast<int>(x) << '\n';
}#include <header.hpp>
#include <my_show_type.hpp>
enum class Color { red, white, black };
enum Color2 { red, white, black };
// 默认的enum class类型为int最大到0x7fffffff
enum class Status { foo=100, bar=0x7fffffff };
// 指定enum class类型
enum class Status2: uint64_t { bar=0xffffffffffffffff };
// 不限范围枚举是自动推理底层型别的, 这意味着修改Status3就需要重新编译整个代码
enum Status3 { bar=0xffffffffffffffff };
int main() {
cout << red << '\n'; // 0
// 注意限定作用域枚举必须强制转化类型
cout << static_cast<int>(Color::red) << '\n'; // 0
PRINT_TYPE(Color::red); // Color
PRINT_TYPE(red); // Color2
hello_color(Color::red); // hello: 0, 调用前置声明中的函数
// 查看底层型别
PRINT_TYPE_DIRECT(std::underlying_type_t<Color>); // int
PRINT_TYPE_DIRECT(std::underlying_type_t<Status2>); // unsigned long
PRINT_TYPE_DIRECT(std::underlying_type_t<Status3>); // unsigned long
return 0;
}Item11:优先使用delete删除函数
当存在一个成员函数不想让其他人调用,例如在继承其他类时候,存在不想要的函数,可以使用两种方法删除:
- 将该函数声明写在
private中,但是会导致成员或友元函数访问,仍然报错 - 在函数声明后面加上
= delete,直接删除该函数
使用= delete优点:
- 可以删除任何函数:成员函数、非成员函数、模板具现(也称模板实例化, template instantiation, 禁止某些指定的模板具现)
删除子类继承的函数
#include <my_show_type.hpp>

class Foo {
public:
    int a{10};
    Foo& operator++(){ ++a; return *this; }  // 前置++
    Foo operator++(int) {  // 后置++
        Foo tmp = *this;
        ++a;
        return tmp;
    }
    void hi() { cout << "hi! empty" << '\n'; }
    void hi(int a) { cout << "hi! int a" << '\n'; }
    void hi(double a) { cout << "hi! double a" << '\n'; }
    void show() { PRINT_TYPE(this); }
};

class Bar: public Foo {
public:
    // 注意: 只要子类重定义了同名函数, 所有父类函数都被隐藏, 除非用using显示引入子类
    using Foo::operator++;  // 手动引入++, 否则删除后两个++都无法找到
    Bar& operator++() = delete;  // 删除前置++
    using Foo::hi;  // 手动引入hi, 否则hi(int), hi(double)无法找到
    Bar& hi() = delete;  // 删除空形参hi
// private:  // 或者使用private隐藏函数, 也可做到相同效果
//     Bar& hi();
};

int main() {
    Bar bar;
    bar++;  // OK
    // ++bar;  // 报错, 已被删除
    // bar.hi();  // 报错
    bar.hi(1);  // hi! int a
    bar.hi(1.0);  // hi! double a
    return 0;
}
禁止部分模板具现
通过对模板特化进行删除即可
#include <my_show_type.hpp>

template<typename T>
void show(T x) { PRINT_TYPE(x); }

template<> void show<double>(double x) = delete;
template<> void show<std::string>(std::string x) = delete;
template<> void show<void*>(void* x) = delete;
template<> void show<nullptr_t>(nullptr_t x) = delete;

int main() {
    int x{123};
    show(x);  // int
    show("123");  // const char*
    show(static_cast<float>(x));  // float
    // show(static_cast<double>(x));  // error: use of deleted function
    // show(std::to_string(x));  // error: use of deleted function
    // show(nullptr);  // error: use of deleted function
    show(&x);  // double*
    // show(static_cast<void*>(&x));  // error: use of deleted function
    return 0;
}
Item12:用override改写函数
- 子类重写函数推荐加上
override声明 - 通过引用饰词(reference qualifier)可以区分左/右值对象调用
下面例子中测试了对void f() const, data_type& get(), data_type& get_v() &, data_type& get_v() &&的重写,测试了成员函数对左右值调用的情况,以及用智能指针unique_ptr对右值的处理效果,可以避免悬空指针的出现(通过拷贝一次)
virtual, override, final, ...=0请参考函数重写与重构中整理的内容
#include <vector>
#include <memory>
#include <my_show_type.hpp>

class Foo {
public:
    using data_type = std::vector<double>;
    virtual void f() const { cout << "HI Foo" << '\n'; }
    virtual data_type& get() = 0;  // 不分左右值调用
    virtual data_type& get_v() & = 0;  // 左值对象调用函数 Bar bar; bar.get_v();
    virtual data_type get_v() && = 0;  // 右值对象调用函数 Bar().get_v();
protected:
    data_type v{1,2,3};
};

class Bar: public Foo {
public:
    void f() const override { cout << "HI Bar" << '\n'; }
    data_type& get() override { return v; }
    data_type& get_v() & override { printf("Call Left\n"); return v; }
    data_type get_v() && override { printf("Call right\n"); return std::move(v); }
};

Foo::data_type* get_rv(bool use_get=true) {
    using dt = Foo::data_type;
    dt* ret;
    if (use_get) {
        auto rv = Bar().get();
        ret = &rv;  // 由于是右值, 出if作用域就会被释放, 产生悬空指针
        printf("get_rv in use_get {}, values=");
        for (auto x: *ret) cout << x << ' '; cout << '\n';
    }
    else {
        static auto v = Bar().get_v();  // Call right
        ret = &v;
    }
    printf("get_rv return, values=");
    for (auto x: *ret) cout << x << ' '; cout << '\n';
    return ret;
}

/* ------------------ 使用智能指针由于将右值拷贝, 所以没有问题 ------------------- */
std::unique_ptr<Foo::data_type> get_rv_smart_ptr() {
    using dt = Foo::data_type;
    std::unique_ptr<dt> ret;
    auto rv = Bar().get();
    ret = std::make_unique<dt>(rv);  // 将右值拷贝一份, ret指向拷贝后的地址
    printf("get_rv_smart_ptr in use_get {}, values=");
    for (auto x: *ret) cout << x << ' '; cout << '\n';
    return ret;
}

int main() {
    std::unique_ptr<Foo> foo = std::make_unique<Bar>();
    foo->f();  // HI Bar, 调用子类重写后的函数
    auto v = foo->get_v();  // Call Left, 纯虚函数, 使用子类重写的函数
    cout << v.size() << '\n';  // 3
    putchar('\n');

    auto rv = get_rv(true);  // 获取右值指针
    for (auto x: *rv) cout << x << ' ';  // 输出乱码
    cout << "\n\n";

    rv = get_rv(false);  // 通过声明全局变量所以正确
    for (auto x: *rv) cout << x << ' ';  // 1 2 3
    cout << "\n\n";

    auto rv_smart = get_rv_smart_ptr();  // 通过智能指针返回默认拷贝所以正确
    for (auto x: *rv_smart) cout << x << ' ';  // 1 2 3
    cout << "\n";
    return 0;
}
Item18:std::unique_ptr
- 对于只需要一个指针指向的地址,可以用
unique_ptr替代裸指针,会在栈上创建unique_ptr<T>对象,当退出作用域时,unique_ptr将自动析构,并调用删除函数释放堆内存,因此可避免内存泄漏 - 可以自定义调用的删除函数,通过定义
unique_ptr<T, decltype(*func)>或unique_ptr<T, decltype<lambda_func>>来实现自定义删除
#include <memory>  // 包含各种智能指针
#include <my_show_type.hpp>

struct Animal {
    std::string name;
    Animal(std::string name): name(name) { }
    ~Animal() { cout << "Destruct: " << name << '\n'; }
};

void del_func2(Animal* ptr) {
    cout << "Call delete func2!\n";
    delete ptr;
}

int main() {
    {  // 定义作用域
    // 两种创建智能指针的方法, 在无需制定删除函数时, 优先使用make_unique
    auto uptr = std::make_unique<Animal>("Dog");
    auto uptr2 = std::unique_ptr<Animal>(new Animal("Cat"));
    // 调用指针方法和普通指针没有区别
    cout << "Unique point animal name: " << uptr->name << '\n';
    }  // 从栈上删除uptr, uptr2, 输出两个(先析构Cat) "Destruct: Cat", "Destruct: Dog"

    // 自定义lambda删除函数
    auto del_func = [](Animal* ptr) {
        cout << "Call delete function!\n";
        delete ptr;
    };
    auto uptr3 = std::unique_ptr<Animal, decltype(del_func)>(new Animal("Horse"), del_func);
    // uptr3.release();  // 将uptr3中的指针以裸指针返回, 该UniquePtr不再对其进行管理
    uptr3.reset();  // 将uptr3中的指针删除, 可重置为另一个Animal*
    // 删除指针时调用del_func, 输出 "Call delete function!", 再调用析构函数

    // 自定义删除函数 (函数指针)
    auto uptr4 = std::unique_ptr<Animal, void (*)(Animal*)>(new Animal("Piggy"), del_func2);
    auto uptr5 = std::unique_ptr<Animal, decltype(&del_func2)>(new Animal("Fox"), del_func2);
    uptr4.reset();  // 调用删除函数del_func2
    uptr5.reset();  // 调用删除函数del_func2
    cout << "END\n";
    return 0;
}
Item19:std::shared_ptr
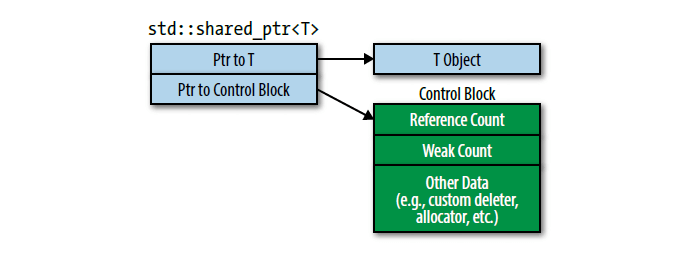
shared_ptr是支持多个指向统一个地址的指针,因此还需要维护一个Control Block,包含对当前还存在的指针计数reference count,每次创建另一个指向该地址的共享指针,必须要共用同一个Control Block否则会出现多次释放的异常,后续用到的weak_ptr就是对shared_ptr进行管理的指针,它可以创建shared_ptr保证他们共享同一个Control Block- 注意,
shared_ptr同样也可以指定删除函数,但是无需在构造模板是声明,它将其存储在Control Block中,因此所有的shared_ptr都会共用同一个删除函数,并最终只会在reference count=0时调用一次
#include <memory>
#include <my_show_type.hpp>

int main() {
    auto del_func = [](int* ptr) {
        cout << "Call delete func!" << '\n';
        delete ptr;
    };
    // 构建带有删除函数的, 无法使用make_shared
    // 注意: shared_ptr类型中不和删除函数绑定, 这与unique_ptr不同
    {
        std::shared_ptr<int> sptr(new int(8), del_func);
        cout << "sptr.use_count=" <<  sptr.use_count() << '\n';
        {
            std::shared_ptr<int> sptr2(sptr);  // sptr2和sptr共用相同的control block
            cout << "sptr sptr2.use_count=" << sptr.use_count() << ' ' << sptr2.use_count() << '\n';  // 2 2
        }  // 退出作用于, 自动析构栈上sptr2, use_count -= 1
        cout << "sptr.unique=" << (sptr.unique() ? "True" : "False") << '\n';  // 判断是否是唯一的
        sptr.reset();  // reset同样会释放指针, 当use_count=0时, 调用删除函数删除堆上内存
        cout << "RESET" << '\n';
    }

    // 也可以使用make_shared通过构造函数创建, 使用默认删除函数
    auto sptr = std::make_shared<int>(123);

    {
        // 不推荐创建裸指针, 不要对同一指针创建两个control block, 否则可能被重复删除两次, 导致未定义错误
        auto ptr = new int(8);
        sptr = std::shared_ptr<int>(ptr);  // 使用shared_ptr可以从指针构建
        // auto sptr2 = std::shared_ptr<int>(ptr);  // 产生两个control block
        // cout << sptr.use_count() << ' ' << sptr2.use_count() << '\n';  // 1 1
    }  // 在退出时, ptr会被连续释放两次, 导致报错!
    cout << "RETURN 0" << '\n';
    return 0;
}下面这个例子给出如何在类中继承std::enable_shared_from_this<T>,通过成员函数创建shared_ptr:
#include <memory>
#include <vector>
#include <my_show_type.hpp>

struct AnimalSingle {
    void add_one(std::vector<std::shared_ptr<AnimalSingle>>& v) { v.emplace_back(this); }
};

void test1() {
    // auto a = AnimalSingle();  // 这是一个栈上对象, 不能用delete来删除, 需要自动释放
    auto a = new AnimalSingle();  // 在堆上创建一个对象, 这样就可以被delete释放了
    std::vector<std::shared_ptr<AnimalSingle>> v;
    a->add_one(v);
    a->add_one(v);
    a->add_one(v);
    cout << v.size() << '\n';  // 3
    for (auto& x: v) cout << x.use_count() << ' ';  // 1 1 1
    cout << '\n';
    // 最后释放会重复在一个地址释放3次, 报错
}

struct Animal: public std::enable_shared_from_this<Animal> {
    void add_one(std::vector<std::shared_ptr<Animal>>& v) {
        v.emplace_back(shared_from_this());
    }
};

void test2() {
    auto del_func = [](Animal* ptr) {
        cout << "Delete animal" << '\n';
        delete ptr;
    };
    auto a = std::shared_ptr<Animal>(new Animal(), del_func);  // 创建第一个control block, 删除函数也只能在这里声明
    // auto a = new Animal();  // 不能这样创建, 否则没有第一个control block
    std::vector<std::shared_ptr<Animal>> v;
    a->add_one(v);
    a->add_one(v);
    a->add_one(v);
    cout << v.size() << '\n';  // 3
    for (auto& x: v) cout << x.use_count() << ' ';  // 4 4 4
    cout << '\n';
}

class Animal2: public std::enable_shared_from_this<Animal2> {
public:
    static auto create() {  // 使用工厂函数初始化类, 保证必定有一个control block
        auto del_func = [](Animal2* ptr) {
            cout << "Delete Animal2" << '\n';
            delete ptr;
        };
        return std::shared_ptr<Animal2>(new Animal2(), del_func);
    }
    void add_one(std::vector<std::shared_ptr<Animal2>>& v) {
        v.emplace_back(shared_from_this());
    }
private:
    Animal2() { }
};

void test3() {
    auto a = Animal2::create();  // 通过工厂函数创建, 保证有第一个control block
    std::vector<std::shared_ptr<Animal2>> v;
    a->add_one(v);
    a->add_one(v);
    a->add_one(v);
    cout << v.size() << '\n';  // 3
    for (auto& x: v) cout << x.use_count() << ' ';  // 4 4 4
    cout << '\n';
}

int main() {
    // test1();  // 直接用this创建shared_ptr, 导致创建多个control block, 释放报错
    // test2();  // 手动创建第一个control block
    test3();  // 最好的写法, 用工厂函数创建第一个control block, 把初始化函数用private保护起来, 更保险
    return 0;
}
Item20:std::weak_ptr
- 可以通过
weak_ptr来创建shared_ptr,也可查看当前shared_ptr创建的个数,检查堆上空间是否被释放 - 应用:缓存、观察者列表、避免
shared_ptr环路
#include <memory>
#include <my_show_type.hpp>

int main() {
    // 可以说先有sptr再有wptr, 通过wptr来管理全部sptr的存在性
    auto sptr = std::make_shared<int>(123);
    auto wptr = std::weak_ptr<int>(sptr);
    {
        cout << sptr.use_count() << '\n';  // 1
        auto sptr2 = wptr.lock();  // 可以用weak ptr来创建shared ptr并且在多线程中保证原子性
        auto sptr3 = wptr.lock();
        auto sptr4 = wptr.lock();
        cout << sptr4.use_count() << '\n';  // 4
    }
    cout << sptr.use_count() << '\n';  // 1
    auto test_lock = [wptr]() {
        // 创建指向同一地址的shared ptr对象, 并且可以检查是否存在
        if (auto sptr2 = wptr.lock()) {
            cout << "sptr2=" << *sptr2 << '\n';
            PRINT_TYPE(sptr2);
        } else {
            cout << "Ptr is NULL" << '\n';
        }
        // 或者通过unexpired检查指针是否释放
        cout << (wptr.expired() ? "Is expired" : "Unexpired") << '\n';
    };
    {
        test_lock();  // sptr2=123, Unexpired
    }
    sptr.reset();
    test_lock();  // Ptr is NULL, Is expired
    return 0;
}
Item23:std::move和std::forward
std::move:就是强制将当前任何变量转为右值,注意,这并不会复制、移动、创建新的对象,新的右值在地址上和原始变量完全一样,只是加上了右值修饰符,大多数情况就是为了在传递给其他函数时把自己装成一个右值,从而可以被他们移动操作解决;因为左值多半是复制操作std::forward:对于模板推理的万能引用中,得到的形参x虽然一定是左值,但是初始来源可能是右值,因此需要通过类别T究竟是T&还是T&&来判断,通过std::forward<T>(x)可以将形参复原到传入的状态下,保持相同的左右值性质;这也在函数调用中常用吧
#include <my_show_type.hpp>

class Annotation {
public:
    explicit Annotation(std::string& text): value(std::move(text)) { }  // 对左值处理, const T& 是一个例外可以接收右值
    explicit Annotation(std::string&& text): value(std::move(text)) { } // 对右值处理
private:
    std::string value;
};

class Annotation2 {
public:
    explicit Annotation2(std::string& text): value(text) { }
    explicit Annotation2(std::string&& text): value(text) { }
private:
    std::string value;
};

class Annotation3 {
public:
    explicit Annotation3(std::string text): value(std::move(text)) { }  // 左右值均可处理
private:
    std::string value;
};

class Annotation4 {
public:
    explicit Annotation4(const std::string text): value(std::move(text)) { }
    // 上式等价于下式, 因为对于常量无法转为右值, 还是按照左值复制处理
    // explicit Annotation4(std::string text): value(text) { }
private:
    std::string value;
};

template<typename T>
decltype(auto) calc_time_used(int mode) {
    MyTimer timer; timer.start();
    auto s = std::string(static_cast<size_t>(1e5), 'A');
    for (int i = 0; i < static_cast<int>(1e5); ++i) {
        if (mode == 0) T a(s);
        else if (mode == 1) T a(std::string(static_cast<size_t>(1e5), 'A'));
        else if (mode == 2) {
            s = std::string(static_cast<size_t>(1e5), 'A');
            T a(s);
        }
    }
    cout << "Time used: " << timer.get_milliseconds() << "ms\n";
}

// 1. create rvalue std::string(static_cast<size_t>(1e5), 'A')
// 2. copy arg `s` to constructor param `text`
// 3. std::move to Annotation::text
// 4. copy param `text` to Annotation::text

// cmd      time_used       create_times        copy_times (s->text)    copy_times (text->Annotation::text)
// 1+3      90 ms           1e5                 0                       0
// 2+3      144 ms          0                   1e5                     0
// 3        0.9 ms          1                   0                       0
// 4        144 ms          0                   0                       1e5
// 1+4      3500 ms         1e5                 0                       1e5
// 2+4      3500 ms         1                   1e5                     1e5
// 1+2+4    3800 ms         1e5                 1e5                     1e5

int main() {
    calc_time_used<Annotation>(1);    // Time used: 90ms
    calc_time_used<Annotation3>(0);   // Time used: 144ms
    calc_time_used<Annotation>(0);    // Time used: 0.9ms
    calc_time_used<Annotation2>(0);   // Time used: 144ms
    calc_time_used<Annotation2>(1);   // Time used: 3500ms
    calc_time_used<Annotation4>(0);   // Time used: 3500ms
    calc_time_used<Annotation4>(2);   // Time used: 3800ms
    return 0;
}#include <memory>
#include <my_show_type.hpp>
class Widget {
public:
int* a;
int val;
Widget(const int& x) { val = x; a = &val; }
Widget(int&& x) { a = &x; }
};
// class Widget { // 使用智能指针无法做到
// public:
// std::unique_ptr<int> a;
// Widget(const int& x) { a = std::make_unique<int>(int(x)); }
// Widget(int&& x) { a = std::make_unique<int>(x); }
// };
int main() {
int a = 10;
Widget w(a); // 左值复制
*w.a = 20;
cout << a << ' ' << *w.a << '\n'; // 10 20
Widget w2(std::move(a)); // 转为右值传入移动
*w2.a = 20;
cout << a << ' ' << *w2.a << '\n'; // 20 20
return 0;
}标准库的std::string就非常受其影响,auto b{std::move(a)}就和auto b = a(这里a是个字符串)分别调用的右值和左值初始化函数
#include <my_show_type.hpp>

int main() {
    std::string a{"abcd"};
    cout << a.size() << '\n';  // 4
    auto b{std::move(a)};
    cout << a.size() << '\n';  // 0
    cout << b.size() << '\n';  // 4
    return 0;
}